
How to Knit the Knit Stitch: A Complete Beginner’s Guide (Continental & English Methods)
Learn how to knit the knit stitch step by step — with clear instructions for both the Continental and English (American) methods, expert tension tips, a full troubleshooting guide, and answers to the most common beginner questions.
The knit stitch is the single most important thing you’ll ever learn in knitting. Everything — scarves, blankets, sweaters, socks — starts here. It’s the foundation of the entire craft. And the good news? It’s much simpler than it looks.
In this tutorial, you’ll learn how to knit the knit stitch using two popular methods: Continental (also called German or picking) and English (also called American or throwing). We’ll walk through each step with clear, detailed instructions, explain common mistakes and how to fix them, and answer the questions beginners ask most.
By the end, you’ll have your first real stitches on your needle — and the confidence to keep going.
What You Need to Get Started
Before we begin, gather your materials. You don’t need much:
- Yarn — any weight works, but beginners do best with worsted weight (medium). It’s easy to see your stitches.
- Knitting needles — match the size to your yarn (check the label). US size 7–9 (4.5–5.5mm) works great for most worsted yarn.
- Needle material — bamboo or wood needles have grip, which prevents stitches from slipping. Highly recommended for beginners.
- A cast-on — you’ll need stitches already on your needle. If you haven’t cast on yet, learn the long-tail cast-on first, then return here.
Note: In knitting patterns, the knit stitch is abbreviated as ‘k’ or ‘K’. K4 means knit 4 stitches. ‘K to end’ means knit every stitch to the end of the row.
What Is the Knit Stitch?
The knit stitch is one of the two fundamental stitches in all of knitting — the other being the purl stitch. Together, these two stitches create virtually every knitting pattern in existence.
When you knit a stitch, you’re pulling a new loop of yarn through an existing loop, creating a new stitch on your right needle while the old stitch slides off the left needle. The result is a smooth ‘V’ shape on the front of the fabric.
The knit stitch is reversible in an important way: the back of a knit stitch looks like a purl stitch. This is why garter stitch (knitting every row) looks the same on both sides — you’re seeing alternating knit and purl faces of the same stitch.
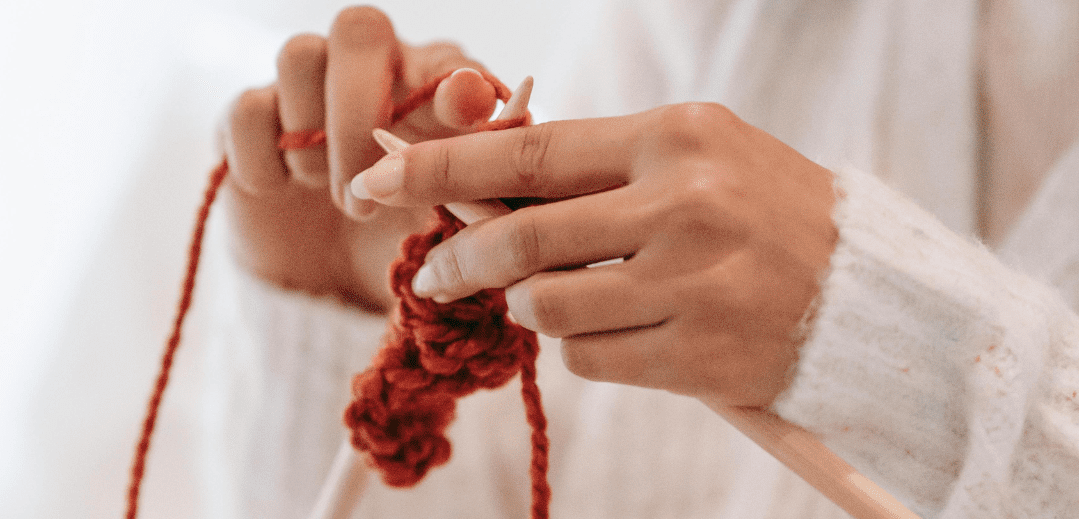
Method 1: Continental Knitting (Picking) — Step by Step
Continental knitting is popular throughout Europe, especially in Germany, Scandinavia, and France. You hold the working yarn in your left hand and ‘pick’ it with the right needle — hence the nickname ‘picking.’
Most knitters find Continental faster once the yarn-holding habit clicks. It also causes less wrist strain because your hands move less. If speed or ergonomics matter to you, Continental is worth learning first.
How to Hold the Yarn (Continental)
Good tension is everything in Continental knitting. Here’s the most reliable method:
- Hold the needle with your cast-on stitches in your right hand.
- Wrap the working yarn clockwise around the pinky finger of your left hand — two times for medium tension.
- Bring the yarn across the back of your left hand and rest it on the last knuckle of your index finger.
- Pick up the needle in your left hand like you’d hold a knife, keeping your index finger almost straight, angled upward to tension the yarn.
Pro Tip: Wrap the yarn around your pinky once for looser tension, three times for tighter. Adjust the angle of your index finger to fine-tune tension on the fly.
Knitting the Stitch: Continental Method
Make sure the working yarn is behind your needle and the knot of your cast-on edge is below the needle. Then follow these steps:
- Hold the needle with stitches in your left hand; pick up the empty needle with your right hand.
- Insert the tip of the right needle into the first stitch on the left needle, going from left to right (front to back).
- Wrap the right needle counterclockwise around the working yarn (the strand resting on your left index finger).
- Pull the right needle back through the stitch, bringing the new loop of yarn with it. You can use your left middle finger to gently hold the stitch in place as you pull.
- Slide the original stitch off the left needle. Your new knit stitch now lives on the right needle.
Repeat steps 2–5 for every stitch across the row. When you reach the end, turn your work so the needle with all the stitches is back in your left hand and start again.
Pro Tip: At first, the yarn-holding will feel awkward. Give it 10–15 rows of practice — it becomes muscle memory quickly.
Method 2: English Knitting (Throwing) — Step by Step
English knitting — also called American knitting or throwing — is the most popular method in the United States and the United Kingdom. You hold the working yarn in your right hand and ‘throw’ it around the needle to form each stitch.
It’s often easier for absolute beginners because there’s no special yarn-holding technique to master upfront. The trade-off is that your hands move more, which can feel slower and is sometimes harder on joints over long sessions.
Knitting the Stitch: English Method
There’s even a classic rhyme to remember the steps: ‘In through the front door, around the back, peep through the window, and off jumps Jack.’ Here’s what each line means:
- Hold the needle with stitches in your left hand. Pick up the empty needle in your right hand.
- ‘In through the front door’ — Insert the right needle into the first stitch from left to right (front to back). The needles will form an X.
- ‘Around the back’ — Use your right hand to throw (wrap) the working yarn counterclockwise around the right needle, creating a loop between the two needles.
- ‘Peep through the window’ — Pull the right needle toward you through the stitch, bringing the new yarn loop with it.
- ‘Off jumps Jack’ — Slide the original stitch off the left needle. One new knit stitch is on the right needle.
Repeat for every stitch in the row. Turn work and continue.
English Variation: Flicking
Flicking is a faster English hybrid: you tension the yarn around your right fingers (similar to Continental), but instead of throwing with your whole hand, you use just your right index finger to flick the yarn around the needle. You never let go of your needles, which saves significant time.
If you want the simplicity of English but the speed of Continental, flicking is worth learning once you’re comfortable with the basic English method.
What Happens When You Knit Every Row? Garter Stitch
When you knit every single stitch of every single row using the knit stitch, you create a pattern called garter stitch. It’s the simplest possible knitting pattern, and it’s surprisingly useful.
Garter stitch has several useful properties: it’s stretchy (horizontally and vertically), it lies completely flat without curling at the edges, it looks identical on both sides (fully reversible), and it creates a textured ridge pattern.
Your first project — a dishcloth, a simple scarf, or a practice swatch — is almost certainly garter stitch. Master the knit stitch and you’ve already mastered garter stitch at the same time.
Continental vs. English: Which Method Is Better?
Neither method is objectively better — both produce identical fabric. The choice comes down to personal preference, ergonomics, and the habits you already have.
| Continental (Picking) | English (Throwing) | |
|---|---|---|
| Speed | Generally faster | Slower — more hand movement |
| Beginner ease | Harder at first (yarn holding) | Easier to start |
| Tension control | Excellent, via finger angle | Variable — requires practice |
| Joint strain | Less — fewer hand movements | More — repetitive throwing motion |
| Best for | Speed, ergonomics, crocheters | Absolute beginners, casual knitters |
Pro Tip: If you already know how to crochet, try Continental first — the yarn-holding technique is very similar.
5 Common Knit Stitch Mistakes (And How to Fix Them)
Every beginner makes these mistakes. Knowing them in advance will save you a lot of frustration.
1. Accidentally Knitting the Tail End
After casting on, there are two strands hanging from your needle: the working yarn (connected to the ball) and the tail (the short end). It’s easy to accidentally grab the tail and knit with it instead of the working yarn.
Fix: Before starting each row, identify which strand goes to the ball of yarn. That’s your working yarn. The tail should hang free and unused.
2. Twisted Stitches (Inserting from the Wrong Direction)
If you insert your needle into the stitch from right to left instead of left to right, you’ll twist the stitch. Twisted stitches look different from regular stitches — tighter, with crossed legs — and they’re visible in the finished fabric.
Fix: Always insert the right needle from the left side of the stitch, pushing it from front to back. Check that the loop sits with its right leg in front of the needle.
Note: Some patterns intentionally call for twisted stitches — this is called ‘knit through back loop’ (k-tbl). But unless your pattern specifies this, always insert from left to right.
3. Dropping a Stitch
A dropped stitch is a loop that slips off your needle. If unnoticed, it will ‘run’ downward through your rows, creating a ladder of loose yarn. Don’t panic — dropped stitches are fixable.
- Just dropped it: Secure it with a safety pin immediately, then slip it back onto the needle carefully without twisting it.
- It ran a few rows: Use a crochet hook to pick up the stitch and work it back up through each ladder rung, one row at a time.
- If it’s complicated: ‘Tink’ (reverse knit) your work — insert the left needle into the stitch below the right needle’s current stitch, then slide the top stitch off.
4. Splitting the Yarn
This happens when your needle pierces through the strand of yarn instead of going through the full stitch loop. It’s more common with sharp-tipped needles or loosely twisted yarns.
Fix: Use rounded-tip needles (bamboo is ideal). If you’ve already split a stitch, reverse knit back one stitch and try again — split yarn creates weak spots in your fabric that can’t be hidden easily.
5. Gaining Extra Stitches (Row Widening)
If your knitting gets wider as you go, you’re accidentally adding stitches. The most common cause: wrapping the yarn over the needle when turning work, which creates an accidental yarn over (a new stitch).
Fix: When turning your work at the end of a row, make sure the working yarn goes under and behind the needle, not over the top. Count your stitches every 5–10 rows when you’re starting out.
Getting Your Tension Right
Tension (sometimes called gauge) refers to how tightly or loosely you knit. Consistent tension creates even, professional-looking fabric. Inconsistent tension creates lumpy, uneven work.
As a beginner, your tension will likely be inconsistent at first — that’s completely normal. Here’s how to improve:
- Knit in the middle of the needle, not at the tips. Forming stitches at the very points makes them too tight.
- Keep consistent yarn tension with your fingers. In Continental, adjust via your index finger angle. In English, maintain light hold on the yarn.
- Don’t pull stitches off the needle — let them slide naturally as you complete each stitch.
- Relax your hands. Gripping tightly is the number one cause of uneven tension and hand fatigue.
Pro Tip: If your tension is consistently too tight, try going up one needle size. If it’s too loose, go down one size. Don’t change your knitting habits to compensate — change the tools instead.
Frequently Asked Questions
What does the knit stitch look like on the needle?
Each knit stitch looks like a small ‘V’ when sitting on the needle. The right leg of the V should be at the front of the needle. If both legs are twisted behind the needle, the stitch is mounted incorrectly and will produce a twisted stitch when knitted.
What’s the difference between a knit stitch and a knit row?
A stitch is a single loop. A row is all the stitches on your needle from one end to the other. When you knit every stitch from left needle to right needle, you’ve completed one row. Then you turn your work and start the next row.
What’s the difference between the knit stitch and garter stitch?
The knit stitch is a technique — a single action. Garter stitch is a pattern — the result of using the knit stitch on every stitch of every row. The knit stitch is the building block; garter stitch is what you build with it.
Can left-handed people knit?
Absolutely. Many left-handed knitters use the standard technique without any modification — your hands quickly adapt. Others prefer to mirror the technique, working right to left instead of left to right. Either approach produces identical fabric.
Which method — Continental or English — should a beginner learn first?
If you have no prior experience: start with English. The yarn holding is simpler and you can focus entirely on the stitch mechanics. Once that’s comfortable, experiment with Continental for speed. Many experienced knitters know both methods and switch based on the project.
Why is my knitting getting wider?
You’re accidentally adding stitches, most likely by wrapping the yarn over the needle when turning your work (creating accidental yarn overs), or by knitting into the space between two stitches as if it were a stitch. Count stitches frequently and make sure the yarn goes behind the needle, not over it, when you turn.
My stitches are too tight to slide on the needle — what do I do?
You’re knitting too tightly. Try to consciously relax your grip on both the yarn and the needles. Also make sure you’re forming stitches in the middle of the needle shaft, not at the pointed tips. If the problem persists, try needles one size larger.
What to Learn Next
Once you’re comfortable with the knit stitch, here’s your natural learning path:
- The purl stitch — the mirror image of the knit stitch. Together they unlock stockinette, ribbing, and seed stitch.
- Binding off (casting off) — how to securely finish your work and get it off the needles.
- Reading knitting patterns — understanding abbreviations, stitch counts, and repeat instructions.
- Your first real project — a garter stitch dishcloth or scarf is the perfect place to practice everything you’ve learned.
The knit stitch is just the beginning. But it’s the most important beginning there is.